
The persistent neck pain from your remote work setup isn’t just about screen height; it’s a failure of your entire ergonomic system.
- True ergonomic correction requires separating your screen (eye level) from your input device (elbow height).
- Stability is non-negotiable; a wobbly stand can create more strain than no stand at all.
Recommendation: Stop treating symptoms and start building a stable, biomechanically neutral workstation with a dedicated stand and external keyboard—your spine will thank you.
As a chiropractor, I see the physical toll of the remote work revolution every single day. It walks into my office as a dull ache at the base of the skull, a persistent stiffness in the shoulders, or a sharp pain between the blades. We call it “Tech Neck,” and it’s an epidemic fueled by one ubiquitous device: the laptop. The standard advice you’ve heard a thousand times—”just raise your screen”—is dangerously incomplete. It addresses one symptom while ignoring the root cause of the problem.
The fundamental design flaw of a laptop is that the screen and keyboard are fused. You can either have the screen at the right height for your neck or the keyboard at the right height for your wrists, but never both simultaneously. Trying to find a “happy medium” is a compromise that guarantees strain on both. True relief doesn’t come from a single adjustment, but from understanding your workstation as an ergonomic system where height, distance, stability, and input methods are all interconnected.
This guide moves beyond generic tips. We will deconstruct this system from a biomechanical perspective, giving you a precise blueprint for a pain-free setup. We’ll calculate exact heights, analyze the physics of stability, and explore how peripherals aren’t just accessories—they are mandatory components for long-term spinal health, all within the context of Canadian workplace safety standards.
For those who prefer a visual overview of ergonomic solutions, the following video explores the popular option of standing desk converters, which operate on similar principles of raising your screen to the correct height.
To navigate this comprehensive guide, the summary below outlines the key pillars of building your resilient, ergonomic workstation. Each section addresses a critical component of the system, guiding you from diagnosis to a complete, pain-free solution.
Summary: Building Your Ergonomic Blueprint for a Pain-Free Workday
- How to calculate the exact height for your screen based on your torso length?
- The Wobble Factor: Why lightweight travel stands often fail for heavy typing?
- Airflow: How raising your laptop can lower CPU temperatures by 5 degrees?
- Why you MUST use an external keyboard when using a laptop stand?
- Aluminum vs. Plastic: Is the weight penalty of metal stands worth the stability?
- Low Profile vs. Mechanical: Which switch type reduces wrist strain for writers?
- Over-ear vs. In-ear: Which style prevents fatigue during 4-hour Zoom marathons?
- Multi-Device Keyboards: How to Control Your Laptop, Tablet, and Phone Simultaneously?
How to Calculate the Exact Height for Your Screen Based on Your Torso Length?
The common advice to “place your screen at eye level” is a good start, but it lacks the precision needed for true ergonomic relief. “Eye level” is not a universal constant; it’s a function of your unique body geometry, specifically your seated eye height which is determined by your torso and neck length. The goal is to achieve biomechanical neutrality for your cervical spine, where your head is balanced directly over your shoulders without tilting forward or back. For most people, this means the top edge of the monitor should be at or just slightly below your horizontal line of sight when you’re sitting upright.
Forcing your gaze downwards to a laptop on a desk pulls your head forward and down, placing immense strain on your neck muscles. For every inch your head moves forward, its effective weight on your spine increases by about 10 pounds. A typical 5-inch downward tilt can feel like you’re carrying a 60-pound weight around your neck all day. This is the mechanism behind Tech Neck. Raising the screen corrects this by bringing the focal point up, allowing your head to rest naturally atop your spine.
To find your ideal height, you don’t need complex formulas. You need a simple, repeatable process of self-audit. The following checklist, aligned with guidelines from the Canadian Centre for Occupational Health and Safety (CCOHS), will help you find your personal ergonomic baseline.
Your Personal Ergonomic Audit Checklist
- Sit upright in your chair with your feet flat on the floor and back supported. Position the top of your screen at or just below your direct eye level.
- Check your viewing distance: It should be approximately one arm’s length away (about 50-70 cm) without you needing to lean in.
- Adjust the screen angle to minimize glare from lights or windows. A slight backward tilt of 10-20 degrees is often ideal.
- Verify your posture: Your shoulders should be relaxed and down, not hunched, with your elbows bent at roughly a 90-degree angle.
- Document your current setup’s measurements. This data can be crucial if you need to justify an equipment request for a proper stand to your HR department.
The Wobble Factor: Why Lightweight Travel Stands Often Fail for Heavy Typing?
Once you’ve elevated your laptop, a new enemy emerges: instability. Many people opt for lightweight, foldable travel stands for their portability and low cost. While these are better than nothing for occasional use, they often introduce a “wobble factor” that can undermine your entire ergonomic setup. This instability creates a subtle but constant vibration that travels through the desk and up into the screen, forcing your eyes to constantly micro-adjust. This can lead to eye strain and headaches, common complaints I hear from my patients.
More importantly, this instability creates a stability cascade. A wobbly stand means you subconsciously “anchor” yourself to the desk with your wrists and forearms to steady the machine while typing, creating tension that radiates up into your shoulders and neck. For heavy typists, this is a disaster. The force of your keystrokes is amplified by the stand’s flimsy construction, creating a feedback loop of vibration and tension. A heavy-duty office stand, by contrast, is designed to absorb and dampen these forces, providing a rock-solid platform that isolates your typing from your screen.
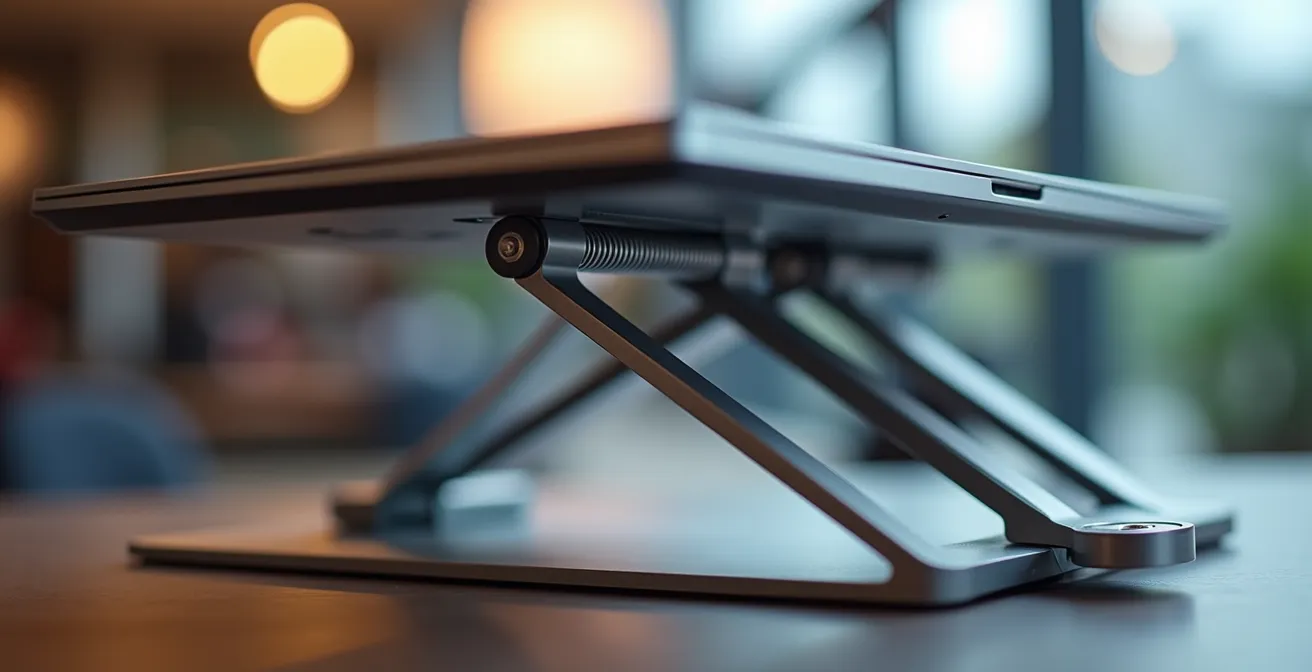
The difference lies in material and engineering. As the close-up shows, high-quality stands use precision-machined joints and dense materials like aluminum to create a rigid frame. This is not about aesthetics; it’s about physics. The added mass and superior construction provide the inertia needed to counteract the forces of typing and keep your screen perfectly still. The following table breaks down the key differences for Canadian professionals choosing their primary workstation tool.
| Feature | Lightweight Travel Stand | Heavy-Duty Office Stand |
|---|---|---|
| Weight | Under 500g | 1-2kg |
| Stability Rating | Moderate | Excellent |
| Best Use Case | Coffee shop warrior | Permanent home office |
| Price Range (CAD) | $30-60 | $80-150 |
| Video Call Quality | Potential shake | Rock solid |
Airflow: How Raising Your Laptop Can Lower CPU Temperatures by 5 Degrees?
An often-overlooked benefit of raising your laptop is the significant improvement in thermal performance. This isn’t just a matter of tech enthusiasm; it has direct ergonomic and productivity implications. Laptops are packed with powerful components in a tight space, and their cooling systems rely on air intakes, typically located on the bottom of the chassis. When a laptop sits flat on a desk, these vents are obstructed, trapping heat and suffocating the machine. This leads to a safety mechanism called thermal throttling.
As one analysis on the business impact of thermal management explains, when a CPU’s temperature hits a critical point, the system intentionally reduces its speed to prevent hardware damage. The result is a sluggish, unresponsive machine, even though you have a high-end processor. This performance drop is often the hidden culprit behind productivity slumps. Frustration leads to poor posture as you lean into the screen, and the heat radiating onto the desk can cause discomfort for your hands and wrists. There’s a clear thermal-postural link: a hot, slow laptop creates a stressful user experience that degrades your posture.
A laptop stand elevates the entire chassis, creating a large, open-air channel underneath. This unobstructed airflow allows the internal fans to work as designed, efficiently pulling in cool air and expelling hot air. The performance impact can be dramatic. When thermally throttled, laptop CPUs can drop from a 50W power draw to as low as 23-30W, effectively halving their processing capability. By simply raising the device, you can prevent this throttling, maintain peak performance, and create a more comfortable, less stressful work environment. A cooler laptop is a faster laptop, and a faster laptop is one that doesn’t fight you all day.
Why You MUST Use an External Keyboard When Using a Laptop Stand?
This is the most critical and non-negotiable part of the entire ergonomic system. Using a laptop stand without an external keyboard is like buying a car and refusing to use the steering wheel. You have solved one problem (screen height) by creating a new, more damaging one: severe wrist and shoulder strain. When you raise your laptop to eye level, the integrated keyboard is now at an awkward, elevated angle. Typing on it forces you to raise your shoulders, flex your wrists upwards (dorsiflexion), and reach forward—a trifecta of biomechanical failure.
This posture is a direct pathway to repetitive strain injuries (RSIs). The consequences are not trivial. In 2022, Canada reported approximately 348,747 accepted lost-time injury claims, a significant portion of which are related to musculoskeletal disorders developed over time from poor ergonomics. The solution is simple: separate the screen from the input device. The laptop on its stand becomes just a monitor. Your hands should rest on an external keyboard placed on the desk surface, allowing your shoulders to remain relaxed and your wrists to stay in a neutral, straight position.

As the image clearly demonstrates, this separation allows you to achieve two different ergonomic goals simultaneously: a neutral neck posture and a neutral wrist posture. This is the cornerstone of a sustainable workstation. Furthermore, for Canadian employees working from home, these necessary ergonomic tools (stand, keyboard, mouse) can often be claimed as a work-from-home expense on your taxes using the T2200 form, so be sure to keep your receipts and consult with an accountant.
Aluminum vs. Plastic: Is the Weight Penalty of Metal Stands Worth the Stability?
When selecting a stand, the choice of material is a primary factor influencing stability, durability, and even thermal performance. The two main contenders are aluminum and plastic. While plastic stands are often lighter and cheaper, from a chiropractic and ergonomic standpoint, the benefits of a well-constructed aluminum stand almost always justify the extra weight and cost for a primary workstation.
The primary advantage of aluminum is its rigidity and density. As discussed in the context of the “wobble factor,” a heavier stand provides a more stable base that resists vibrations from typing. This is especially true for laptops over 3 lbs or for users with a heavier typing style. Aluminum is also far more durable; it resists cracks, warping, and fatigue from repeated adjustments, ensuring a longer functional lifespan. A good aluminum stand is a buy-it-for-a-decade investment, whereas a plastic one may need replacing every couple of years.
Furthermore, aluminum is an excellent thermal conductor. The stand itself acts as a large heat sink, passively drawing heat away from the laptop’s chassis and dissipating it into the air. This complements the improved airflow, further reducing the risk of thermal throttling. Plastic, conversely, is an insulator; it traps heat against the laptop’s body, potentially making the overheating problem worse. For professionals in Canada who value sustainability, aluminum is also 100% recyclable, offering a better end-of-life-cycle option.
| Criteria | Aluminum Stands | Plastic Stands |
|---|---|---|
| Heat Dissipation | Excellent – acts as heat sink | Poor – insulates heat |
| Durability (years) | 5-10 years | 2-4 years |
| Weight Capacity | Up to 6.8 lbs | Up to 4 lbs |
| Recyclability | 100% recyclable | Limited recyclability |
| Corporate Image | Premium, sustainable | Budget-conscious |
Low Profile vs. Mechanical: Which Switch Type Reduces Wrist Strain for Writers?
Choosing an external keyboard opens up a new layer of ergonomic optimization: the key switch mechanism. This is the component beneath each keycap that registers a keystroke. The two most common types are low-profile (often scissor or chiclet style) and mechanical. For users like writers, developers, or anyone spending hours typing, the switch type can significantly impact wrist strain by altering key travel distance and the force required for actuation.
Low-profile keyboards, like those found on most laptops or models like the Logitech MX Keys, have a very short travel distance. This means less finger movement is required to register a key press, which can reduce fatigue over long typing sessions. They are also generally quieter, making them an excellent choice for open-plan offices or for remote workers who need to minimize noise during video calls. The flatter profile also encourages a more neutral wrist posture with less upward extension.
Mechanical keyboards, favored by gamers and typing purists, offer a longer travel distance and distinct tactile feedback. This feedback can help reduce “bottoming out” (pressing the key harder than necessary), but the increased travel can also lead to more finger fatigue for some users. The key is to find a switch with an appropriate actuation force (the pressure needed to register a press). Heavy switches can be fatiguing, while light ones can reduce strain. Ultimately, the best choice is personal, but here are some general guidelines for different roles:
- For Developers: Mechanical switches with clear tactile feedback (45-60g actuation force) can improve accuracy.
- For Writers & Long-Form Typists: Low-profile scissor switches (50-55g actuation force) often reduce finger travel and fatigue.
- For Open Offices: Silent or quiet-dampened switches are essential to maintain a professional, low-noise environment.
- For Hybrid Workers: A multi-device keyboard with quiet, low-profile switches offers the most versatility and consideration for others.
Over-ear vs. In-ear: Which Style Prevents Fatigue During 4-hour Zoom Marathons?
With the rise of remote work, headphones have become a permanent fixture for many professionals, worn for hours on end during back-to-back video calls. A 2024 Zoom survey found that 72% of professionals use multiple devices throughout their day, often requiring seamless audio switching. However, beyond connectivity, the physical design of the headset—specifically over-ear versus in-ear—has a major impact on physical fatigue.
In-ear models, or earbuds, are lightweight and discreet. However, for extended wear, they can cause two problems. First, they create direct pressure inside the ear canal, which can lead to discomfort and soreness over several hours. Second, by sealing the ear canal, they can trap heat and moisture, sometimes leading to irritation. Their main advantage is portability and minimal interference with glasses or hairstyles.
Over-ear headphones are generally the superior choice for preventing fatigue during long “Zoom marathons.” They distribute their weight and clamping force over a much larger surface area on the outside of the ear and around the head, avoiding concentrated pressure points. High-quality models use breathable materials like velour or perforated leather on the earcups to minimize heat and sweat buildup. By enclosing the ear, they also provide better passive noise isolation, meaning you can keep the volume lower to hear clearly, reducing the risk of auditory fatigue. The trade-off is their larger size and potential for creating a “hot” feeling for some users, but for marathon sessions, avoiding direct pressure in the ear canal is the winning strategy for comfort.
Key Takeaways
- True ergonomic safety for laptop users requires separating the screen from the keyboard using a stand and an external keyboard.
- A stable, heavy stand (preferably aluminum) prevents the “wobble factor” and acts as a heat sink, improving both posture and performance.
- Your ideal screen height is personal; the top of the screen should be at or just below eye level when you are sitting upright.
Multi-Device Keyboards: How to Control Your Laptop, Tablet, and Phone Simultaneously?
In today’s hyper-connected remote workspace, the “workstation” is no longer a single computer. It’s an ecosystem of devices: a primary laptop, a tablet for notes, and a smartphone for communication. Managing these simultaneously often leads to a chaotic desk and fractured posture, as you constantly shift, reach, and reorient yourself to interact with each screen. A multi-device keyboard elegantly solves this ergonomic puzzle, consolidating control of your entire digital world into a single, stationary input device.
These keyboards are designed with a built-in switching function that allows you to pair them with two or three different devices via Bluetooth or a unified receiver. With the press of a single button, you can seamlessly switch from typing a report on your laptop to replying to a message on your phone, all without moving your hands from their optimal ergonomic position. This eliminates the need to reach for your phone or hunch over a tablet, preserving the biomechanical neutrality you worked so hard to establish with your stand and chair.

This consolidation of control streamlines your workflow, reduces mental friction, and, most importantly, keeps your body in a safe, supported posture. As leading manufacturers like Logitech Canada specify for their products, the goal is effortless control. As they note in their product specifications:
Pair your keyboard with up to three devices and switch between them with the press of an Easy-Switch™ button
– Logitech Canada, MX Keys Product Specifications
By unifying your inputs, you transform a cluttered, posture-destroying collection of gadgets into a cohesive and efficient ergonomic system. This is the final piece of the puzzle, allowing you to maintain peak productivity and spinal health across your entire digital life.
Now that you understand the components of a complete ergonomic system, the next logical step is to perform a thorough audit of your own workspace. Use this knowledge not as a set of loose tips, but as a blueprint to build a workstation that actively supports your health and productivity for years to come.