
Taming the “cable spaghetti” under your standing desk is about more than just looks; it’s a crucial step for mental clarity and protecting your tech investment.
- Visual clutter from cables can subtly increase stress levels (cortisol).
- Improper tools like tight zip ties can permanently damage expensive cords.
Recommendation: Start by investing in a CSA-certified surge protector and flexible management tools like velcro straps or a cable spine.
You’ve invested in a beautiful, minimalist standing desk. It’s the centrepiece of your home office, a symbol of productivity and modern design. Yet, when you look beneath the pristine surface, you’re greeted by a chaotic tangle of black and grey wires—a “spaghetti” monster of power cords, chargers, and USB cables. For a perfectionist, this visual disruption isn’t just an aesthetic issue; it’s a source of low-grade, constant frustration that undermines the very sense of order you were trying to create.
The common advice is often tactical and superficial: use cable trays, buy some zip ties, or mount a power bar. While these are parts of the solution, they miss the fundamental point. They treat the symptom—the messy wires—without addressing the underlying causes of our discomfort. These quick fixes often lead to a rigid, inflexible system that’s a nightmare to adjust when you add a new monitor or change your laptop charger. True organization is not about hiding chaos; it’s about creating an intentional, functional, and stress-free system.
What if the key wasn’t just hiding the mess, but understanding its real impact? The secret to lasting cable management lies in a deeper approach, one that acknowledges both the psychological and technical consequences of disorder. It’s about tackling the visual noise that drains your focus and ensuring the physical integrity of your expensive equipment. This isn’t just about making your desk “look nice”; it’s about reclaiming your mental space and building a workspace that is as resilient and adaptable as it is beautiful.
This guide will walk you through a professional organizer’s methodology. We will explore the psychological impact of clutter, the technical risks of poor management, and provide specific, actionable strategies tailored for a modern, flexible workspace, with special considerations for the Canadian home office.
Summary: A Professional Organizer’s Guide to Conquering Cable Clutter
- Visual Noise: Why seeing messy cables actually increases your cortisol levels?
- Bend Radius: How tight cable ties can actually damage your expensive HDMI cords?
- The Standing Desk Dilemma: How to organize cables that need to move up and down?
- Tech Pouches: The best way to organize chargers inside your laptop bag?
- Who Pulled the Plug? Why labeling both ends of the cable saves IT headaches?
- Power Bar vs. Surge Protector: The $20 difference that saves your $3000 laptop
- The Universal Adapter: Why a boring utility item is often the most appreciated gift?
- How to Build a “Disaster-Proof” Home Office Setup for Canadian Winters?
Visual Noise: Why seeing messy cables actually increases your cortisol levels?
The feeling of unease you get from seeing a tangle of wires isn’t just you being a perfectionist. It’s a recognized psychological phenomenon known as visual noise or visual clutter. Our brains are hardwired to seek order and make sense of our environment. When confronted with a chaotic mess of cables, our brain has to work harder to filter out the irrelevant information, leading to a subtle but constant cognitive load. This state of low-grade disorder can trigger the release of cortisol, the body’s primary stress hormone. Over time, this chronic stress can deplete your mental energy, reduce your ability to focus, and diminish your overall productivity.
In a professional home office, where focus is paramount, eliminating this visual noise is a functional necessity. A clean, organized workspace sends a signal to your brain that you are in a controlled, calm environment, allowing for deeper concentration and creative thought. This is especially relevant in the Canadian work landscape, where remote work has become a permanent fixture. A Statistics Canada study on teleworking found that 90% of new teleworkers reported accomplishing at least as much work per hour at home as in the office. Creating an optimized environment, free from the stress of clutter, is a key factor in maintaining that high level of productivity.
Think of cable management not as a chore, but as a form of mental decluttering. By creating clean, intentional pathways for your cables, you are removing a significant source of subconscious distraction. This simple act can lower your daily stress levels, improve your mood, and free up mental bandwidth that can be better spent on complex tasks. The goal is to create a “visual silence” where your tools serve you without demanding your attention. This allows you to enter a state of flow more easily, making your work not only more efficient but also more enjoyable.
Ultimately, a tidy desk with well-managed cables is an investment in your own mental well-being, transforming your workspace from a source of friction into a sanctuary of focus.
Bend Radius: How tight cable ties can actually damage your expensive HDMI cords?
While a tangled mess of cables creates mental stress, the “solution” can sometimes create a more expensive physical problem. The common practice of using cheap, rigid plastic zip ties to bundle cables tightly is a leading cause of unseen damage. Every cable, from a simple USB cord to a high-performance HDMI 2.1 cable, has a specified minimum bend radius. This is the tightest curve a cable can be bent into without damaging the delicate internal wiring and shielding. When you cinch a zip tie too tightly, you often force the cable into a curve far sharper than its designed limit.
This excessive bending can cause several issues. It can break the tiny copper conductors inside, leading to intermittent signal loss or complete failure. For high-bandwidth cables like HDMI or DisplayPort, it can compromise the shielding, making the signal susceptible to interference, which manifests as screen flickering, artifacts, or “sparkles.” You might blame your new monitor or laptop, when the real culprit is the $0.05 zip tie that has slowly been strangling your $50 cable. This is why professional organizers and IT managers have almost universally abandoned plastic zip ties in favour of softer, more forgiving solutions.
The key is to maintain the cable’s integrity by using management tools that group cables without compressing or kinking them. Reusable velcro straps are an excellent starting point, as they can be adjusted and are much gentler on cable jackets. Magnetic clips and flexible fabric sleeves are other great options that guide cables along a path without putting stress on them. This not only protects your investment in expensive peripherals but also ensures a reliable, high-performance connection you can count on.
The following table provides a clear comparison of common cable management solutions, contextualized for the Canadian market, highlighting why choosing the right tool is crucial for protecting your hardware.
| Solution Type | Price Range (CAD) | Reusability | Cable Protection |
|---|---|---|---|
| Plastic Zip Ties | $5-10 | No | Poor – Can damage cables |
| Velcro Straps | $10-20 | Yes | Good – Gentle on cables |
| Magnetic Clips | $15-30 | Yes | Excellent – No compression |
| Cable Spine System | $40-80 | Yes | Best – Full protection |
By investing a few extra dollars in the right solution, you can save yourself hundreds in replacement costs and troubleshooting headaches down the line.
The Standing Desk Dilemma: How to organize cables that need to move up and down?
A standing desk introduces a unique challenge: dynamic movement. A static cable management system that works perfectly for a traditional desk will fail spectacularly here. Cables must have enough slack to extend when the desk is raised, but not so much that they become a tangled mess when it’s lowered. This requires a solution that is both flexible and secure, a concept we can call dynamic organization. Simply bundling cables and attaching them to the desk leg is a recipe for disaster; one forgotten cable snagged on the way up can send a laptop or monitor crashing to the floor.
The most elegant and effective solution for this problem is a vertically-articulated cable management system, often called a “cable spine” or “cable snake.” This solution consists of a series of interlocking vertebrae-like segments that create a flexible channel. It attaches to the underside of your desk and runs down to a weighted base on the floor. Wires are fed through this channel, keeping them neatly contained and protected.
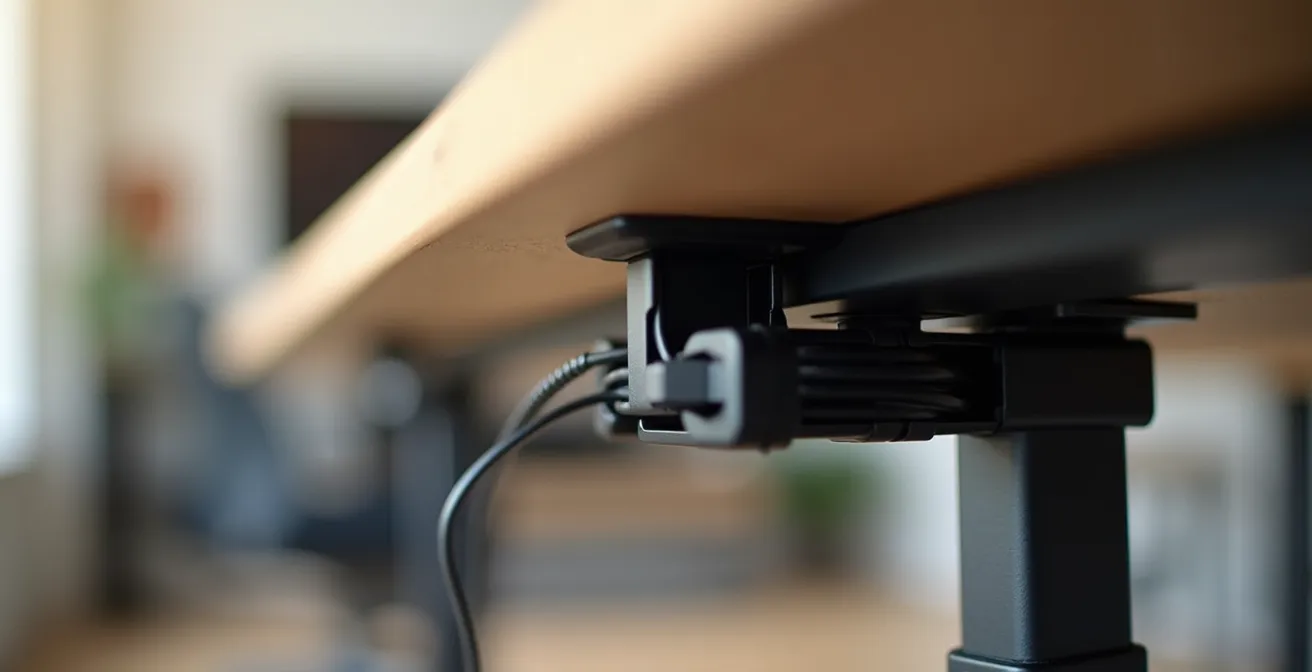
As the desk moves up and down, the spine flexes and extends, ensuring the cables have the perfect amount of slack at any height. This prevents snagging, pinching, and excessive wear on the cords. As the experts at The Standing Desk Blog point out, this combination of strength and flexibility is what makes it the superior choice for any sit-stand setup.
Since standing desks are designed to move up and down, vertical standing desk cable management requires both strength and flexibility. The most elegant solution is a cable management system – a magnetic snake that connects to the powder coated steel of your desk frame magnetically, keeping a number of wires all together in one place, and flexing with your desk. These are sometimes called cable spines, because they are composed of individual links similar to vertebrae, and each link can pivot, creating a long flexible chain.
– The Standing Desk Blog, Cable Management Tips for Standing Desks
When setting up a cable spine, the key is to route all cables from your desktop devices (monitor, speakers, webcam) into the spine, which then leads to a power strip mounted underneath the desk. This way, only a single, protected bundle of power and data cables needs to travel with the desk, creating the cleanest and safest possible configuration.
This approach transforms the standing desk from a cable management headache into a seamless and truly organized part of your workspace.
Tech Pouches: The best way to organize chargers inside your laptop bag?
In today’s hybrid work environment, your office is no longer a single location. It’s your desk at home, a hot desk at corporate headquarters, a coffee shop, or even a seat on the VIA Rail train. This mobility brings its own organizational challenge: how to transport your essential tech accessories without them turning into a “rat’s nest” in your laptop bag. The answer is the humble but powerful tech pouch, an essential tool for the modern Canadian professional.
The rise of hybrid models is not a temporary trend. Research shows that a significant majority of Canadian professionals now expect this flexibility. In fact, a recent survey revealed that 56% of Canadian workers rank hybrid work as their top choice. This shift makes having a portable, organized tech kit non-negotiable. A good tech pouch acts as a “go-bag” for your digital life, ensuring you have the right charger, cable, and adapter at your fingertips, no matter where you are working from.
A superior tech pouch is defined by its internal organization. Look for models with multiple compartments, elastic loops, and zippered pockets. This allows you to segregate your items by function: power bricks in one section, data cables in another, and delicate dongles or SD cards in a secure pocket. This compartmentalization prevents your USB-C cable from getting tangled with your headphones and protects charging prongs from scratching your portable battery bank. For the ultimate setup, consider labeling your main chargers with a small label maker so you can grab the right one in a dimly lit conference room without a second thought.
This level of organization does more than save you a few seconds of rummaging. It reduces the mental friction of transitioning between workspaces. Knowing that everything is in its designated place provides a sense of control and preparedness, allowing you to set up and get to work quickly and efficiently, wherever your day takes you.
It’s a small investment that pays significant dividends in reduced stress and increased productivity for the hybrid worker.
Who Pulled the Plug? Why labeling both ends of the cable saves IT headaches?
In any setup with more than three or four devices, the back of your computer or the power strip can quickly become an anonymous sea of identical black cables. When you need to troubleshoot an issue or simply unplug a specific device, you’re forced to play a frustrating game of “follow the leader,” tracing a cable from one end to the other. This is not just an inconvenience; in a professional setting, it’s a significant time-waster. The solution is simple, inexpensive, and profoundly effective: labeling both ends of every cable.
This practice, which we can call intentional connectivity, transforms a chaotic system into a logical and serviceable one. Using a simple label maker or even pre-made cable tags, you can clearly identify what each cable is and what it connects to. The label at the device end might say “Monitor 2 – HDMI,” while the label at the power strip end says “Monitor 2.” Now, if you need to unplug that monitor, you can do so with absolute certainty in seconds, without accidentally powering down your main computer or external hard drive in the middle of a task.

This principle is even more critical in the context of remote and hybrid work. When an IT department is trying to troubleshoot an issue over the phone or video call, being able to say “Unplug the cable labeled ‘Docking Station’ from the surge protector” versus “Unplug the third black cable from the left” is the difference between a five-minute fix and a thirty-minute ordeal. This efficiency is crucial, as a lack of direct, physical interaction is a known barrier to productivity when remote technical support is needed.
This simple discipline of labeling saves cumulative hours of frustration over the life of your setup. It empowers you to manage your own technology with confidence and makes any future upgrades or changes significantly easier. It’s a one-time investment of 30 minutes that pays for itself the very first time you need to solve a connection problem under pressure.
This small step elevates your workspace from merely looking organized to being genuinely functional and intelligent.
Power Bar vs. Surge Protector: The $20 difference that saves your $3000 laptop
Many people use the terms “power bar” and “surge protector” interchangeably, but they are fundamentally different devices. A basic power bar is simply an extension cord with multiple outlets. It offers convenience but provides zero protection against electrical disturbances. A surge protector, on the other hand, is a vital piece of safety equipment designed to defend your valuable electronics from voltage spikes. That $20 price difference between a cheap power bar and a quality surge protector is the insurance policy that can save your $3,000 laptop or 4K monitor from being destroyed in an instant.
Power surges are brief but powerful increases in voltage that can occur for many reasons, including lightning strikes, issues with the local power grid, or even the cycling on and off of large appliances in your home. These spikes can fry the sensitive microcircuits in modern electronics. A surge protector works by absorbing and diverting this excess energy away from your devices. Its protective capacity is measured in Joules. The higher the Joule rating, the more energy it can absorb before it fails. For expensive and sensitive equipment like computers, monitors, and networking gear, a rating of at least 2,000 Joules is highly recommended by Canadian electrical safety standards.
When purchasing a surge protector in Canada, it’s absolutely essential to look for a certification mark from the CSA (Canadian Standards Association) or a similar recognized body like cUL. This mark indicates that the product has been independently tested and meets stringent Canadian safety standards. Many reputable surge protectors also come with a “connected equipment warranty,” where the manufacturer will cover the cost of replacing your devices if they are damaged by a surge while properly connected. This is a clear indicator of the manufacturer’s confidence in their product.
Your Action Plan: Selecting a CSA-Certified Surge Protector
- Verify Certification: Look for a clear CSA or cUL certification mark directly on the product packaging and the unit itself.
- Check Joule Rating: Choose a model with a minimum rating of 2,000 Joules for workstations with computers and monitors.
- Assess Warranty: Prioritize models that offer a warranty for connected equipment, noting the coverage amount.
- Look for Indicators: Ensure the unit has indicator lights for both “Protection On” and “Grounded” to confirm it’s working correctly.
- Plan for Replacement: Understand that surge protectors wear out. Plan to replace them every 3-5 years, or immediately after a major electrical event like a lightning storm.
Never plug expensive electronics into a basic power bar. It’s a needless gamble with a high potential cost.
The Universal Adapter: Why a boring utility item is often the most appreciated gift?
In the world of corporate gifting, flashy gadgets and trendy items often take the spotlight. Yet, one of the most practical, appreciated, and frequently used gifts you can give a modern professional is a high-quality universal travel adapter. It may seem “boring,” but its utility far outweighs its lack of glamour. For anyone who travels for business, whether across provinces or across oceans, a reliable adapter isn’t just a convenience; it’s an essential tool that can make or break a trip.
The need for such a tool is growing. As Canadian businesses operate on a global scale and remote work policies become more flexible, the lines between home, office, and travel are blurring. The ability to work from anywhere is becoming a reality for more people. A high-quality adapter empowers this mobility, ensuring that a professional can power their laptop and charge their phone in a hotel in London, a conference centre in Berlin, or a partner’s office in New York without a second thought. It removes a significant point of friction and anxiety associated with international travel.
What separates a great universal adapter from a cheap one? Three key features:
- Broad Compatibility: It should include sliders or interchangeable plugs for at least the major international standards: Type A/B (North America/Japan), Type G (UK/Hong Kong), and Type C/F (Europe).
- High-Power USB-C PD: A modern adapter must have a built-in USB-C Power Delivery (PD) port capable of delivering at least 65W. This allows a user to charge their laptop directly from the adapter, eliminating the need to carry a separate bulky power brick.
- Safety Certifications: Just like a surge protector, a travel adapter must be certified for safety. For use and sale in Canada, it should have CSA or cUL certification, while CE marking is crucial for European use.
This combination of features transforms the adapter from a simple plug converter into a powerful, all-in-one charging station for the global professional.
It’s a thoughtful, practical gift that demonstrates an understanding of the real needs of a travelling employee, ensuring they stay powered and productive wherever they go.
Key Takeaways
- Messy cables aren’t just ugly; they create “visual noise” that increases cognitive load and stress.
- Using tight plastic zip ties can damage cables by violating their minimum bend radius, leading to signal failure.
- For a standing desk, a flexible “cable spine” is the best solution for managing wires that need to move.
How to Build a “Disaster-Proof” Home Office Setup for Canadian Winters?
For professionals in Canada, building a robust home office goes beyond aesthetics and ergonomics; it requires planning for a uniquely Canadian challenge: the winter. Severe weather, from ice storms in Ontario and Quebec to blizzards in the Prairies, can lead to power outages that bring productivity to a grinding halt. A “disaster-proof” setup is about building power resilience and protecting your equipment from the specific environmental conditions of a Canadian winter.
The cornerstone of a resilient setup is an Uninterruptible Power Supply (UPS). A UPS is essentially a large battery backup that sits between the wall outlet and your equipment. When the power goes out, it instantly switches to battery power, giving you crucial time to save your work and shut down your computer gracefully. This prevents data loss and protects your hardware from the damaging power fluctuations that can occur when electricity is restored. For a typical home office with a computer and one or two monitors, a 1500VA unit from a reputable brand is a solid investment.
Beyond power, winter brings other hazards. Dry indoor air from central heating increases the risk of static electricity, which can damage sensitive computer components. Using an anti-static mat under your chair and a small humidifier in the room can mitigate this risk. Furthermore, be mindful of cable placement. Never run cables near baseboard heaters or portable space heaters, as the heat can melt the cable insulation and create a serious fire hazard. A well-managed cable system not only looks better but is also safer. Finally, a complete resilience plan includes a backup for your internet connection. A mobile hotspot on your phone, with a plan from a major Canadian carrier like Rogers, Bell, or Telus, can be a lifesaver when your home internet goes down.
Building this disaster-proof setup involves a few key steps:
- Install a UPS: Connect your essential equipment (computer, monitor, modem/router) to a UPS battery backup (minimum 1500VA).
- Secure Backup Internet: Ensure you have a mobile hotspot plan ready as a secondary internet source.
- Manage Heat Hazards: Route all cables away from baseboard heaters and other heat sources.
- Control Static: Use anti-static mats and consider a humidifier to combat the dry winter air.
- Test Regularly: Don’t wait for a storm. Test your backup systems monthly to ensure they are ready when you need them.
By taking these proactive steps, you can ensure that your home office remains a productive and safe environment, no matter what the Canadian winter throws at you.
Frequently Asked Questions About Cable Management Accessories
What certifications should a universal adapter have for Canadian use?
For safe use and sale in Canada, a universal adapter must have CSA (Canadian Standards Association) or cUL (a UL mark certified for Canada) certification. If you plan to travel to Europe, also look for the CE marking, which indicates conformity with health, safety, and environmental protection standards for products sold within the European Economic Area.
What wattage is needed for modern laptop charging?
For most modern business laptops that charge via USB-C, a minimum of 65W (watts) using Power Delivery (PD) is required for effective charging. For more powerful, high-performance models, such as those used for video editing or gaming, 100W is the recommended standard to ensure the laptop can charge even while under heavy load.
Which plug types are essential for Canadian business travelers?
A good universal adapter for a Canadian business traveler should cover the most common international destinations. The essentials are: Type A/B (used in North and Central America and Japan), Type C/F (the standard for most of Europe), and Type G (used in the United Kingdom, Ireland, and parts of Asia like Singapore and Hong Kong).